Jicama Farming
Jicama farming profit per acre has emerged as an attractive opportunity for farmers looking to maximize income from limited land. On a single acre, jicama cultivation can generate a total income of NRs. 200,000 while requiring a relatively modest investment of NRs. 44,000. This results in a substantial net profit of NRs. 156,000, with an impressive profit percentage of 354.5%. Such high returns, combined with the crop’s adaptability and growing market demand, make jicama farming a highly lucrative and promising agricultural venture for both small-scale and commercial farmers.

Land Preparation
Proper land preparation is essential for establishing a strong root system in jicama, which develops large, swollen taproots that require loose, deep soil. The field should first be plowed deeply to a depth of 20–25 cm (8–10 inches) to break any hardpan layers, allowing the taproot to penetrate and expand easily.
After plowing, the land is harrowed 2–3 times to break down soil clods and create a fine, well-leveled seedbed that ensures good seed-to-soil contact and prevents waterlogging. Although jicama can be cultivated on flat land, forming raised beds or ridges—typically 30–40 cm high and 60–100 cm apart—is highly beneficial, as it improves soil aeration, enhances drainage, and facilitates better tuber development and easier harvesting.
Soil Type
Jicama grows best in well-drained sandy loam or loamy soils rich in organic matter, with a slightly acidic to neutral pH range of 6.0 to 7.0, as the plant is sensitive to alkaline conditions. The soil should be deep and loose to support proper tuber development, since heavy clay soils restrict root expansion, resulting in small, misshapen tubers and a higher risk of rot.
Climatic Requirements
Jicama is a tropical crop that thrives in a long, warm, frost-free growing season lasting 5–9 months, with optimal temperatures between 25°C and 35°C (77°F to 95°F). It is highly sensitive to frost and low temperatures, which can stunt growth. The plant requires full sunlight for vigorous growth and proper tuber formation, and while it prefers moderate rainfall and can tolerate short dry periods once established, consistent soil moisture is essential for uniform tuber development.

Major Cultivars
There are two main types of jicama, distinguished by seed color:
a) Jicama de Agua
Jicama de Agua is the variety most commonly cultivated and consumed. It is easily identified by its crisp, juicy white flesh that appears slightly translucent and offers a refreshing crunch. This type is the one typically available in both local produce stalls and international markets. Its seeds are generally pale yellow to light brown. Owing to its pleasant flavor and attractive appearance, Jicama de Agua is the preferred option for eating fresh and for large-scale farming.
b) Jicama de Leche
Jicama de Leche is less common and generally regarded as inferior in quality compared with Jicama de Agua. Its flesh is denser and more fibrous, with a milky tone and a milder, less sweet taste. The seeds are often dark red or black. Because of its tougher texture and limited consumer appeal, Jicama de Leche is rarely cultivated for commercial purposes.
Propagation
Jicama is almost exclusively propagated by seeds. Using tubers for propagation is possible but uncommon and inefficient for large-scale farming.
Seed Rate per Acre
The seed rate depends on the spacing. For a standard spacing of 20-30 cm between plants and 60-100 cm between rows, the seed requirement is approximately 3 to 4 kilograms of seeds per acre.
Nursery Management
Although direct seeding is common, jicama can also be started in a nursery to achieve better germination control and extend the growing season in marginal climates. Seeds are sown in well-prepared nursery beds or seedling trays filled with a sterile potting mix, and soaking them in water for 12–24 hours before sowing helps enhance germination. The seedlings should be kept moist and placed in a warm, protected environment until they develop 2–3 true leaves, at which point they are ready for transplanting, usually 3–4 weeks after sowing.
Planting
a). Planting Season
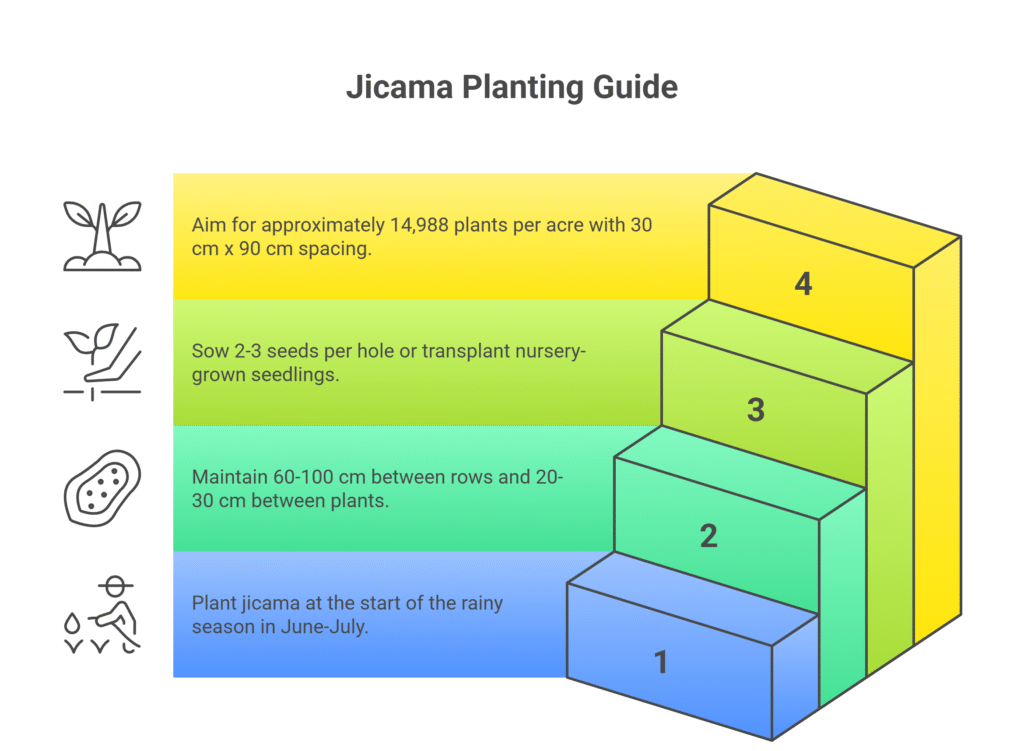
In tropical regions, it is often planted at the beginning of the rainy season in June – July.
b). Spacing
A spacing of 60 – 100 cm between rows and 20 – 30 cm between plants is recommended for jicama cultivation, as it ensures adequate sunlight exposure, proper air circulation, and sufficient space for tuber expansion.
c). Planting Method
For direct seeding, 2–3 seeds are sown per hole at a depth of 2–3 cm, and after germination, the seedlings are thinned to retain the strongest one. In the case of transplanting, nursery-grown seedlings are carefully moved to the main field, ensuring that the root ball remains intact and undisturbed during the process.
d). Number of Plants per Acre
With a spacing of 30 cm x 90 cm, you can accommodate approximately 14,988 plants per acre.
Intercropping
Jicama is well-suited for intercropping, particularly during its early growth stage (the first 2–3 months) before the vines fully cover the ground. Short-duration crops such as lettuce, radishes, bush beans, or other leafy greens can be planted between the rows to maximize land use and generate additional income before the jicama tubers are ready for harvest.
Irrigation
| Growth Stage | Irrigation Requirement | Purpose/Remarks | |
| Germination / Early Growth | Keep the soil consistently moist but not waterlogged. | Ensures uniform germination and healthy seedling establishment. | |
| Vegetative Stage | Provide regular irrigation. | Promotes vigorous vine growth and overall plant development. | |
| Tuber Bulking Stage | Maintain consistent soil moisture. Avoid drought stress. | Crucial for developing large, succulent tubers, as water stress results in smaller, tough, and fibrous roots. | |
| Pre-Harvest | Reduce or stop irrigation 1–2 weeks before harvest. | Allows the skin to thicken and enhances tuber storage quality. | |
Fertilizer and Manure
| Category | Type / Stage | Recommendation |
| Organic Manure | Basal Application (Before Planting) | Incorporate 10-15 tons of well-rotted Farmyard Manure (FYM) or compost per acre. |
| Biofertilizers | During Planting | Apply per acre: • Azospirillum: 750 g • Phosphorus Solubilizing Bacteria (PSB): 750 g • Potash Mobilizing Bacteria: 750 g |
| Chemical Fertilizers | Total Dose (per acre) | 40-60 kg N, 50-60 kg P₂O₅, and 50-60 kg K₂O |
| At Planting | Apply the entire dose of P₂O₅ and K₂O, plus half (½) of the N dose. | |
| Top-Dressing | Apply the remaining half (½) of the N dose when the vines begin to run (approx. 4-6 weeks after planting). |
Weed Control
Weed competition is most severe during the first 2–3 months of jicama growth, before the vine canopy covers the ground. Typically, 2–3 rounds of manual weeding are required during this period to ensure healthy plant development.
Applying organic mulch such as straw or dried leaves, or using plastic mulch, is highly effective in suppressing weeds, conserving soil moisture, and maintaining a cool soil temperature. Pre-emergence herbicides may also be used for weed control, but they must be applied carefully according to label instructions to prevent damage to the jicama plants.
Interculture Operation
Jicama, being a vigorous vine, benefits greatly from intercultural operations such as training and pruning. Providing support through trellising helps keep the vines and leaves off the ground, which improves air circulation, reduces the risk of disease, increases sunlight exposure, and results in straighter, cleaner, and often larger tubers.
Although not always essential, pruning or pinching the vine tips once the plant is well established can help redirect energy from excessive vegetative growth toward tuber development, thereby enhancing yield quality.
Flowering and Fruit Management
Jicama is a short-day plant that begins flowering when the day length decreases. However, since the main goal of cultivation is root production, flowering is undesirable as it diverts the plant’s energy away from tuber development. To maintain optimal yield, any flowers that appear should be promptly pinched off, ensuring that the plant focuses its resources on tuber growth. In some regions, breeding programs emphasize selecting cultivars that are slow to flower to further enhance root production efficiency.
Pest and Disease Management
Common Pests
a). Aphids and Whiteflies
Aphids and whiteflies are common sucking pests that feed on plant sap, weakening the plants and potentially transmitting viral diseases. Regular monitoring is essential, especially on the underside of leaves where these pests tend to congregate.
They can be effectively controlled using insecticidal soap (2–3 ml per liter of water) or neem oil (3–5 ml per liter of water) sprayed thoroughly on affected areas. For severe infestations, chemical insecticides such as imidacloprid 17.8% SL (0.3 ml per liter of water) or thiamethoxam 25% WG (0.25 g per liter of water) can be applied, ensuring rotation of active ingredients to prevent resistance.
b). Root-Knot Nematodes
These microscopic worms attack the roots, forming galls or knots that restrict nutrient and water uptake, resulting in stunted growth and reduced yield. To manage them, practice crop rotation with non-host crops like cereals and use nematode-free soil or seedlings for planting.
Soil solarization before planting and the application of neem cake (1–2 tons per hectare) can help reduce nematode populations. In severe cases, soil treatment with carbofuran 3G (1 kg active ingredient per hectare) or phorate 10G (10 kg per hectare) may be used, following all safety guidelines.
c). Cutworms and Beetles
Cutworms and beetles feed on stems, leaves, and young seedlings, often cutting plants at ground level. Regular field inspection, removal of crop residues, and use of light traps can help minimize their occurrence.
Biological control using Bacillus thuringiensis (Bt) formulations is recommended for early infestations. In case of heavy damage, apply chlorpyrifos 20% EC (2.5 ml per liter of water) or cypermethrin 25% EC (1 ml per liter of water) as a foliar spray, focusing on the base of plants and nearby soil to target larvae effectively.
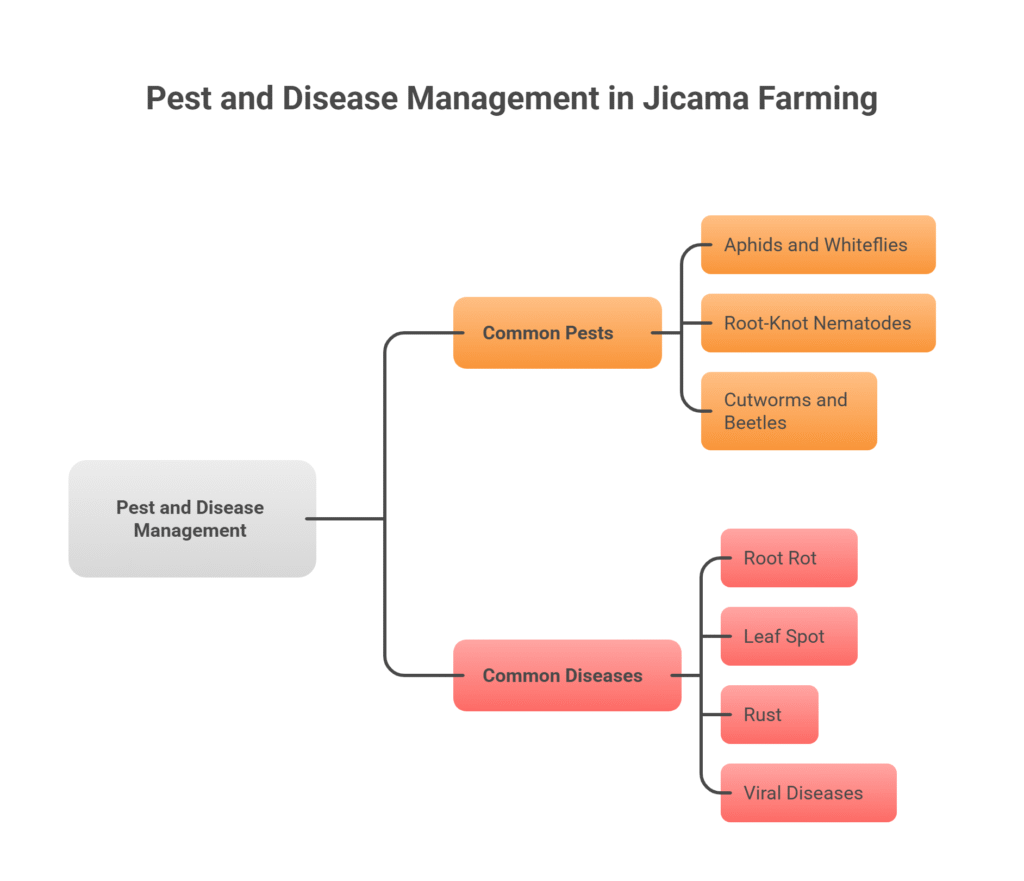
Common Diseases
a). Root Rot (e.g., Pythium, Fusarium)
Root rot is a soil-borne disease that thrives in waterlogged and poorly drained soils, leading to yellowing, wilting, and decay of roots. Prevention is the best approach—ensure proper drainage, avoid overwatering, and use well-aerated soil.
Seed treatment with carbendazim 50% WP at 2 g per kg of seed before sowing helps protect young seedlings. In case of infection, drench the soil around affected plants with metalaxyl 8% + mancozeb 64% WP (2.5 g per liter of water) or carbendazim 50% WP (1 g per liter of water) to suppress fungal growth.
b). Leaf Spot
Leaf spot diseases, caused by various fungal pathogens, appear as circular or irregular brown spots on leaves, which may coalesce and lead to leaf drop. To manage the disease, avoid overhead irrigation and maintain good air circulation within the crop canopy.
At the first sign of symptoms, spray mancozeb 75% WP (2.5 g per liter of water) or chlorothalonil 75% WP (2 g per liter of water) at 10–15-day intervals. Repeat applications as needed, especially during humid weather conditions.
c). Rust
Rust disease manifests as orange to reddish-brown pustules on the underside of leaves, reducing photosynthesis and plant vigor. Early detection and removal of infected leaves help limit its spread. Spraying propiconazole 25% EC (1 ml per liter of water) or tebuconazole 25% EC (1 ml per liter of water) effectively controls the disease. Apply the fungicide twice at 10-day intervals for best results.
d). Viral Diseases
Viral diseases cause mosaic patterns, leaf curling, and stunted plant growth, leading to reduced yield. Since viruses have no direct cure, control focuses on preventing their spread by managing insect vectors such as aphids and whiteflies.
Regularly spray imidacloprid 17.8% SL (0.3 ml per liter of water) or thiamethoxam 25% WG (0.25 g per liter of water) to suppress vector populations. Additionally, remove and destroy infected plants promptly to prevent the virus from spreading to healthy ones.
Harvesting
Jicama tubers are generally ready for harvest 5 to 9 months after planting, depending on the cultivar and growing conditions. Maturity is indicated when the plant’s leaves begin to yellow and die back, signaling that the tubers have fully developed.
During harvest, the soil around the tubers should be carefully loosened with a fork or spade, and the tubers gently lifted by hand to prevent bruising or cutting. It is best to carry out harvesting when the soil is dry to minimize damage and ensure better post-harvest quality.
Yield
The yield of jicama largely depends on factors such as cultivar type, climate, soil fertility, and overall management practices. On average, a well-managed crop produces between 8,000 and 12,000 kilograms (8 to 12 metric tons) per acre, while under optimal growing conditions and excellent management, yields can reach up to 15,000 kilograms (15 metric tons) per acre or more. After harvest, the tubers can be stored for 1–2 months in a cool, dry, and dark place to maintain their freshness and quality.
Cost of Production per Acre for Jicama farming
| S.N. | Categories | Cost (NRs.) |
| 1 | Land Preparation | 15,000 |
| 2 | Seed | 1,000 |
| 3 | Seed Sowing | 1,000 |
| 4 | Fertilizers and Manure | 8,000 |
| 5 | Irrigation | 5,000 |
| 6 | Weed Control | 2,000 |
| 7 | Pest & Disease Control | 2,000 |
| 8 | Harvesting | 5,000 |
| 9 | Miscellaneous Costs | 5,000 |
| Total Investment Cost | 44,000 |
Income per Acre from Jicama Farming per Acre
| Particulars | Estimated Yield (kg/acre) | Market Price (NRs. /kg) | Total Income (NRs.) |
| Jicama Yield | 10,000 | 20 | 200,000 |
Analysis of Jicama Farming Profit Per Acre
| Particulars | Amount (NRs.) |
| Total Income | 200,000 |
| Total Investment | 44,000 |
| Net Profit | 156,000 |
| Profit Percentage | 354.5% |
Investing in jicama farming per acre is highly profitable, yielding a net profit of NRs. 156,000 per acre, which is approximately 3.5 times the initial investment. Most of the costs are incurred in land preparation, fertilizers, and irrigation, while the income potential is significant due to the high market demand and price of jicama. Proper management of pests, diseases, and harvesting practices ensures maximum yield and profitability.
Crop Calander of Jicama Farming
| Growth Phase | Time Period | Key Activities & Operations |
| Pre-Planting & Land Preparation | 2-4 weeks before planting | 1. Land Preparation: Deep plowing (20-25 cm) followed by 2-3 harrowings to create a fine tilth. Form raised beds (30-40 cm high, 60-100 cm apart). 2. Basal Fertilization: Incorporate 10-15 tons of well-rotted FYM/compost. |
| Planting | Start of rainy season (e.g., June-July in tropics) | 1. Seed/Planting: Direct sowing or transplanting seedlings with 2-3 true leaves. 2. Spacing: 20-30 cm between plants, 60-100 cm between rows. 3. Fertilizer (Basal): Apply full dose of P₂O₅ (50-60 kg) & K₂O (50-60 kg), plus half the N (20-30 kg). 4. Biofertilizers: Apply Azospirillum, PSB, and Potash Mobilizing Bacteria (750g each). |
| Early Growth (First 2 Months) | Months 1 & 2 | 1. Irrigation: Keep soil consistently moist for germination and seedling establishment. 2. Thinning: (For direct seeding) Thin to one strong seedling per hole. 3. Weed Control: 2-3 rounds of manual weeding or use of mulch. 4. Intercropping: Plant short-duration crops (e.g., lettuce, radish) between rows. |
| Vegetative & Vine Run Stage | Months 3 & 4 | 1. Top-Dressing: Apply the remaining half dose of N (20-30 kg) when vines begin to run. 2. Irrigation: Provide regular irrigation for vigorous vine growth. 3. Interculture: Consider providing trellises for support and pruning vine tips to direct energy to tubers. |
| Tuber Bulking & Development | Months 5 – 8 (or until harvest) | 1. Irrigation: Maintain consistent soil moisture. Critical for producing large, juicy tubers. Avoid drought stress. 2. Pest/Disease Mgmt.: Monitor and control aphids, whiteflies, nematodes, root rot, and leaf spots as needed. 3. Flower Management: Pinch off any flowers that appear to divert energy to tuber growth. |
| Maturity & Pre-Harvest | 1-2 weeks before harvest | 1. Irrigation: Reduce or stop irrigation to thicken the skin and improve storage quality. |
| Harvesting & Post-Harvest | Months 5 – 9 (depending on cultivar) | 1. Harvesting: Harvest when leaves yellow and die back. Carefully loosen soil and lift tubers by hand to avoid damage. 2. Yield: Expected yield of 8,000 – 12,000 kg/acre (can be up to 15,000 kg). 3. Storage: Store tubers in a cool, dry, dark place for 1-2 months. |