
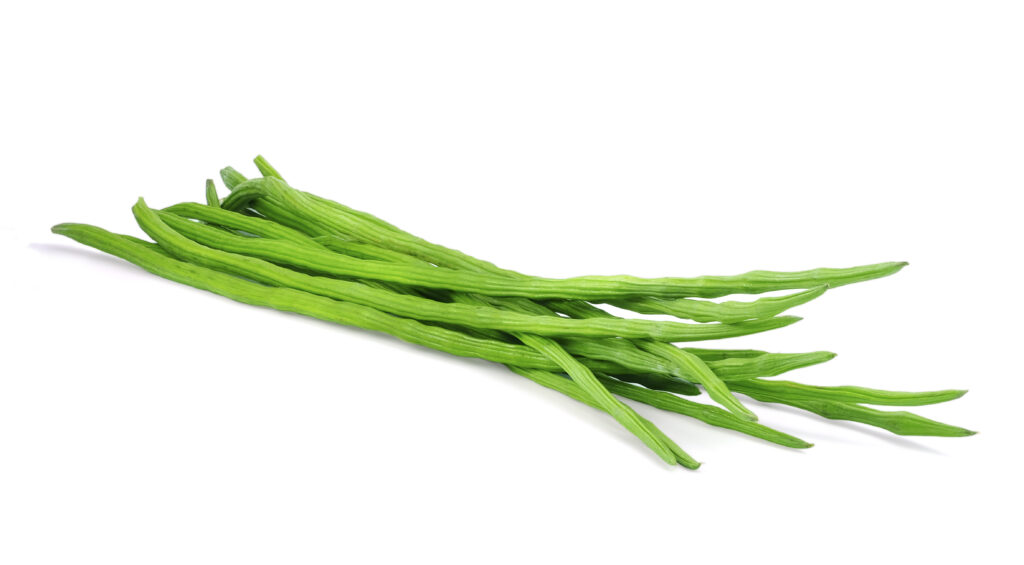
Moringa Cultivation
Moringa cultivation produces nutrient-rich tender and mature pods, leaves, and flowers that are widely used in culinary preparations, offering exceptional nutritional value with fruits containing high levels of vitamin C , carotene, phosphorus, and essential minerals like magnesium, potassium, sulphur, and chlorine.
In Moringa cultivation practices, the crop serves dual purposes – grown in homesteads for family consumption or commercially for market supply, where its tender leaves and flowers, nutritionally comparable to colocasia, play a vital role in addressing malnutrition among both urban and rural populations. While most drumstick cultivation focuses on pod production, certain Moringa varieties from West Indies are primarily grown for their foliage, and interestingly, the roots serve as a substitute for horseradish, with the root, bark, and seeds finding numerous industrial applications as well.
Land Preparation
To ensure successful drumstick cultivation, proper land preparation is crucial—begin by plowing the field two to three times to achieve a fine, crumbly soil texture, which helps break up large clods and promotes healthy root growth. Simultaneously, clear the land of weeds, stones, and any debris that might obstruct plant growth, and ensure adequate drainage to prevent waterlogging, a common issue in dense soils that can lead to root rot.
For large-scale farming, mechanized tools like tractor-drawn plows and rotavators are ideal, as they ensure uniform soil consistency while improving efficiency, aeration, water retention, and nutrient distribution. This thorough groundwork establishes the ideal environment for drumstick plants, leading to stronger growth, higher productivity, and overall farming success.
Soil Type
| Factor | Ideal Condition | Unsuitable Condition | Importance |
| Soil Type | Well-drained sandy loam or loam | Heavy clay or waterlogged soils | Facilitate healthy root growth and reduces risk of root diseases. |
| Organic Matter | High organic content | Nutrient-deficient soils | Improves soil structure, fertility, and promotes vigorous plant development. |
| Soil pH | 6.2–7.0 (slightly acidic to neutral) | Extreme pH levels | Ensures maximum nutrient absorption and availability for optimal growth. |
Climatic Requirements
| Factor | Optimal Condition | Tolerance Range | Additional Notes |
| Climate Type | Warm tropical to subtropical | – | Thrives in consistent warmth with minimal frost exposure. |
| Temperature Range | 25°C – 35°C | Can tolerate up to 48°C briefly | Extreme cold (<10°C) stunts growth. |
| Rainfall | – | 250 – 1500 mm annually | Supplemental irrigation needed in prolonged dry spells. |
| Altitude | Up to 1000 meters | – | Higher elevations may reduce growth rate. |
| Sunlight Requirement | Full sun (6–8 hours daily) | – | Essential for vigorous growth and high yields. |
Major Cultivars
| Cultivar | Key Characteristics | Special Features |
| PKM-1 | High-yielding, early maturity (6 months) | Ideal for quick harvest cycles |
| PKM-2 | Longer pods, higher yield than PKM-1 | Better pod quality and productivity |
| Dhanraj | Suitable for leaf production | Preferred for moringa leaf cultivation |
| Coimbatore-2 | Drought-resistant | Performs well in water-scarce regions |
| ODC-3 | Suitable for high-density planting | Space-efficient cultivation |
Planting Guidelines for Moringa Cultivation
| Aspect | Details |
| a) Planting Season | • Optimal: June–November (monsoon advantage) • Year-round possible: With irrigation in tropical regions |
| b) Spacing | |
| i) Traditional (Pod Production) | • Spacing: 1.8m × 1.8m • Plants/Acre: ~1,200 • Advantages: Allows canopy growth, sunlight, and easy interculture |
| ii) High-Density (Leaf Production) | • Spacing: 0.9m × 0.9m • Plants/Acre: ~5,000 • Use: Commercial leaf powder/tea production • Requires: Precise irrigation & nutrient management |
| c) Pit Preparation | • Pit Size: 30cm × 30cm × 30cm • Soil Enrichment: Mix excavated soil with: – 10 kg FYM – 100g neem cake (pest control) – 50g SSP (nutrient boost) |
| d) Planting Method | |
| i) Seed Propagation | • Direct Sowing: 2–3 seeds/pit (1–2 inch depth), thin to 1 seedling • Transplanting: Start in polybags, move 35–40-day-old seedlings |
| ii) Cutting Propagation | • Use 1m long, 4–6cm thick hardwood cuttings • Advantages: Faster growth, true-to-type plants |
| e) Plants per Acre | • Pod Production: 1,200 (1.8m × 1.8m) • Leaf Production: 5,000 (0.9m × 0.9m) |
Intercropping in Moringa Cultivation
| Intercropping Type | Suitable Crops | Benefits |
| Vegetables | Cowpea, Spinach, Radish, Coriander | Utilize partial shade, suppress weeds, improve soil health |
| Pulses (Legumes) | Green Gram, Black Gram | Nitrogen fixation enhances soil fertility |
| Short-Duration Crops | Onion, Garlic | Efficient land use, additional income before drumstick canopy fully develops |
Moringa Irrigation Schedule by Growth Stage
a). Germination Stage (0–15 days)
Drumstick seeds require high moisture during germination. Irrigate twice daily for the first 3 days, then reduce to once daily. Use sprinklers or drip irrigation to maintain consistent moisture while avoiding waterlogging, which can cause seed rot.
b). Seedling Stage (15–60 days)
Young drumstick plants need moderate water. Irrigate every 3–4 days, adjusting based on soil type: sandy soils may need water every 2–3 days, while clay soils can go 4–5 days. Drip irrigation is ideal for controlled watering.
c). Vegetative Growth Stage (2–6 months)
This phase demands high water for stem and leaf development. Water weekly, increasing to twice weekly in hot climates. Drip irrigation with mulching helps retain soil moisture and supports vigorous growth.
d). Flowering & Pod Formation (6–9 months)
Consistent moisture is critical for optimal pod yield. Irrigate every 5–7 days using drip systems to ensure uniform soil moisture. Water stress during this stage can reduce pod production.
e). Mature Trees (1+ years)
Established drumstick trees are drought-tolerant and need minimal water. Irrigate every 10–15 days, using basin or drip methods. Skip irrigation during monsoon rains to prevent overwatering.
Fertilizer and Manure Requirements for Moringa Per Acre
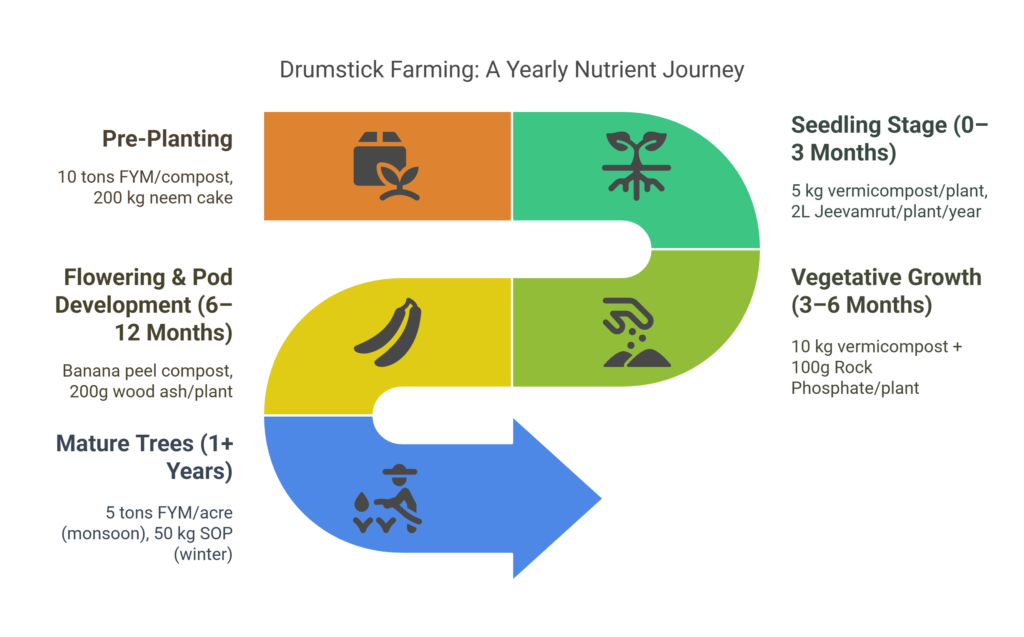
a) Pre-Planting Stage
For optimal drumstick cultivation, incorporate 10 tons of FYM/compost and 200 kg neem cake per acre as organic inputs, along with 50 kg SSP and 20 kg Zinc Sulfate (if soil tests show deficiency) as inorganic amendments, thoroughly mixing them into the soil during plowing to ensure proper nutrient distribution while utilizing neem cake’s natural pest-deterrent properties for healthier plant establishment.
b) Seedling Stage (0–3 Months)
For optimal drumstick cultivation, incorporate 10 tons of FYM/compost and 200 kg neem cake per acre as organic inputs, along with 50 kg SSP and 20 kg Zinc Sulfate (if soil tests show deficiency) as inorganic amendments, thoroughly mixing them into the soil during plowing to ensure proper nutrient distribution while utilizing neem cake’s natural pest-deterrent properties for healthier plant establishment.
c) Vegetative Growth Stage (3–6 Months)
During the vegetative growth stage of drumstick plants, apply a combination of 10 kg vermicompost and 100g Rock Phosphate per plant as organic inputs, supplemented with 50g Urea and 50g 10:26:26 NPK every 60 days as inorganic fertilizers, along with 0.5% ZnSO₄ and 0.2% Boron as foliar sprays to prevent micronutrient deficiencies while the Rock Phosphate works to improve phosphorus availability in the soil for optimal plant development.
d) Flowering & Pod Development (6–12 Months)
During the flowering and pod development stage (6-12 months), drumstick plants benefit from organic inputs like banana peel compost and 200g wood ash per plant, along with inorganic fertilizers including 100g of 13:0:45 NPK during flowering and 50g potassium sulfate per plant, where the high potassium content from both wood ash and sulfate of potash significantly enhances pod quality while maintaining proper nutrient balance by avoiding excessive nitrogen application during this critical flowering phase.
e) Mature Trees (1+ Years)
For mature drumstick trees (1+ years old), apply 5 tons of farmyard manure (FYM) per acre during the monsoon season as organic input, supplemented with 100 kg of 17:17:17 NPK fertilizer during monsoon, 50 kg of sulfate of potash (SOP) in winter, and 10 kg of micronutrient mix (containing iron, zinc, and manganese) annually, where the FYM and annual micronutrient application help maintain long-term soil fertility while the balanced NPK during monsoon and potassium-rich SOP in winter work synergistically to ensure consistent pod production throughout different seasons.
Weed Control in Moringa Cultivation
| Method | Implementation | Benefits | Precautions |
| a) Manual Weeding | Perform regularly during the first 2-3 months after planting | Eliminates competition for nutrients, water and sunlight | Must be done carefully to avoid damaging young plants |
| b) Mulching | Apply 4–6-inch layer of dry leaves/straw around plants | Suppresses weeds, retains moisture, regulates soil temperature, enriches soil | Keep mulch 2-3 inches away from plant stem to prevent rot |
| c) Herbicides | Glyphosate as pre-emergence application | Effective chemical weed control | Use selectively, follow dosage guidelines strictly, avoid plant contact |
Pest and Disease Management
Common Pests in Moringa Cultivation
| Pest | Symptoms/Damage | Control Measures | Preventive Actions |
| a) Pod Fly (Physiological Disorder) | Drying and splitting of fruits from tip with gummy exudate | Remove affected fruits promptly | • Maintain consistent soil moisture • Apply 0.2% borax foliar spray at flowering • Harvest at 60-70% maturity |
| b) Aphids & Whiteflies | Sap-sucking insects that stunt growth and spread diseases | Spray Imidacloprid 0.5% solution | • Ensure thorough coverage of leaf undersides • Monitor regularly for early detection |
| c) Budworm | Larva bores into flower buds causing premature shedding | Spray Chlorpyriphos (2ml/liter water) | • Time spraying at early flowering stage • Remove and destroy affected buds |
Common Diseases in Moringa Cultivation
| Disease | Symptoms | Control Measures | Preventive Actions |
| a) Powdery Mildew | White powdery patches on leaves, stems and pods | Spray Wettable Sulfur (2g/liter water) every 10-14 days | • Maintain proper plant spacing • Avoid overhead irrigation |
| b) Root Rot | Root discoloration, plant wilting, yellowing leaves | Apply Trichoderma as biocontrol agent | • Ensure proper drainage • Avoid waterlogging • Practice crop rotation |
| c) Damping Off | Pre-emergence: Seed rot before surfacing Post-emergence: Water-soaked brown lesions at collar region, “wire stem” symptoms | • Treat seeds with fungicide • Apply Trichoderma in nursery beds | • Use sterilized soil mix • Avoid excessive moisture • Ensure proper ventilation |
| d) Twig Canker | Vein clearing, leaf chlorosis, drooping petioles, vascular browning, rapid wilting | Remove and destroy infected plants immediately | • Use disease-free planting material • Disinfect tools • Avoid wounding plants |
Harvesting Practices in Moringa Cultivation
a). Pod Harvesting
For optimal pod harvesting in drumstick cultivation, fast-maturing varieties like PKM-1 are typically ready for first harvest 6–8 months after planting, with the best culinary quality achieved when pods are tender and measure 40–60 cm in length; ideal maturity indicators include firm but non-woody texture, while overmature pods should be avoided as they become fibrous and lose market value.
To maintain continuous production, harvest every 2–3 weeks during peak seasons, as regular picking stimulates further flowering and fruiting, ultimately yielding 8–12 tons per acre depending on cultivar selection and farm management practices.
b). Leaf Harvesting
For leaf harvesting in drumstick cultivation, begin the initial harvest 6 months after planting when plants are well-established, following a sustainable plucking schedule every 35-40 days to allow proper regrowth while removing only mature leaves and preserving young shoots for continued growth; in dedicated leaf-production systems using high-density plantations, annual yields typically reach 4-6 tons per acre, though higher production is achievable through optimized fertilization and irrigation management practices.
I have a question:
we have an area of two ha outside Nairobe, at JuJu-Farm, at an altitude of over 1000m. It is frost-free. Is it still possible to plant there Moringa-trees?
Kind regards,
Bro. Konrad
Moringa oleifera grows well from sea level up to about 1,500 m, and since your farm is over 1,000 m high and frost-free climate, the conditions are suitable. The tree can survive dry periods, but it grows better and produces more leaves if it gets enough water, so giving extra irrigation in the dry season is helpful. Therefore, planting Moringa at your site is a good choice, and with proper care—especially watering during dry times—it can grow well and provide plenty of leaves, pods, and seeds.
In some countries like China, Japan etc. Moringa cultivation method is specified as artificial planting. Does this cultivation method affect the nutritional value of the plant? Thank you for you in advance for your expert reply.
Artificial or controlled-environment planting of Moringa does not reduce its nutritional value; in fact, when properly managed, it often results in more uniform, cleaner, and sometimes even more nutrient-rich leaves than field-grown plants. This is because the nutritional content of Moringa is primarily determined by factors such as the plant’s genetics (variety), soil fertility including nitrogen, organic matter, and micronutrient levels, the amount of sunlight received, water quality and stress conditions, the age at which leaves are harvested, and the post-harvest handling and drying process.