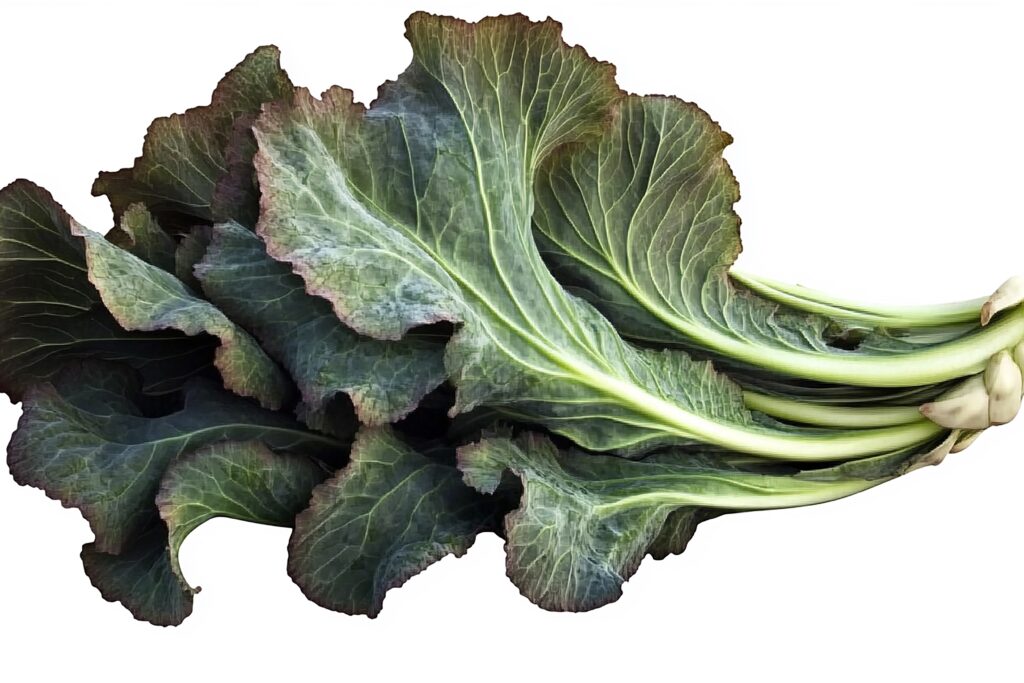
Collard Green Farming
Collard greens (Brassica oleracea var. viridis), a robust leafy vegetable within the Brassica family and closely related to kale, cabbage, and broccoli, are distinguished by their large, dark green leaves; these leaves are exceptionally nutritious, being rich sources of vitamins A, C, and K, along with calcium, iron, and fiber.
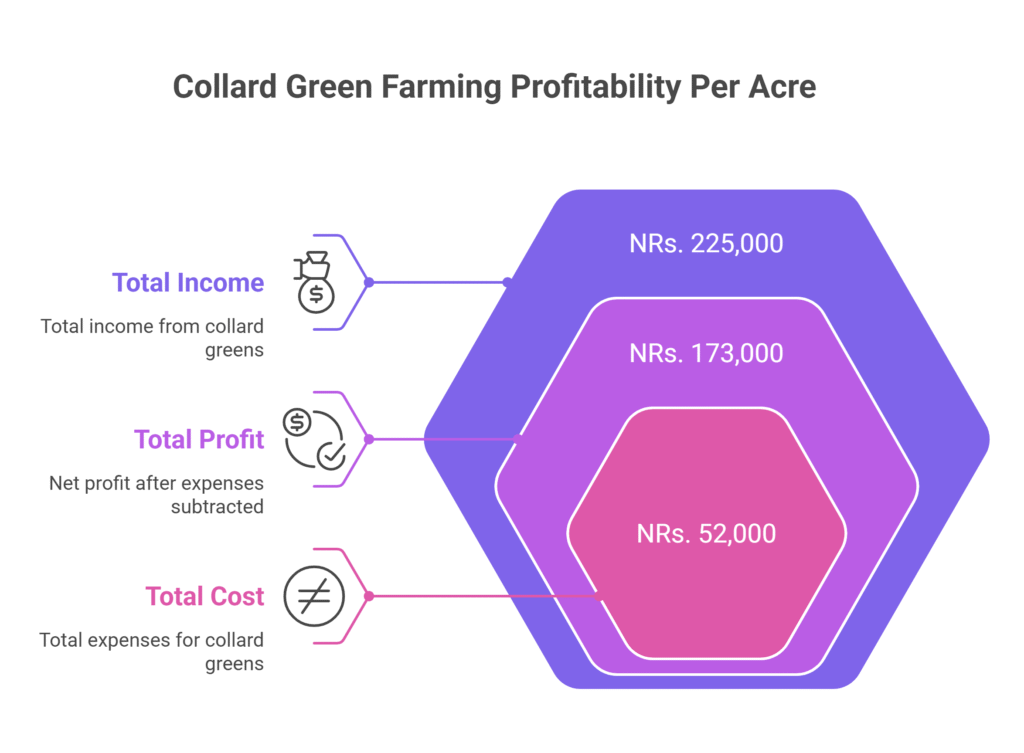
Collard green farming profit per acre demonstrates the high potential of this crop as a lucrative agricultural venture. With a total income of NRs. 225,000 against a production cost of only NRs. 52,000, farmers can secure a net profit of NRs. 173,000. The profitability indicators are highly favorable, showing a Benefit-Cost Ratio of 4.33, which means every rupee invested yields about 4.3 rupees in return. Similarly, the net profit margin is an impressive 76.9%, while the Return on Investment (ROI) reaches around 332%, clearly proving that collard green farming offers excellent financial returns per acre under the given assumptions.
Land Preparation
Land preparation for collard greens begins with removing weeds, stones, crop residues, and debris from the field. Primary tillage follows, using plowing or rotovation to loosen compacted soil to a depth of 8–12 inches (20–30 cm), enhancing aeration and drainage. Subsequent secondary tillage (e.g., harrowing or disking) refines the soil into a fine, level tilth by breaking clods, uniformly mixing organic matter, and creating a smooth seedbed.
In poorly drained or high-rainfall areas, construct raised beds 4–6 inches high and 3–4 feet wide to prevent waterlogging; flat beds suffice in well-drained soils. During final harrowing, incorporate 10–15 tons per acre of well-decomposed farmyard manure or compost to enrich soil fertility and structure.
Soil Type
Collard greens flourish in deep, fertile loamy soils enriched with organic matter but can also tolerate sandy and clay loams if they are well-drained. The ideal soil pH is slightly acidic to neutral, between 6.0 and 6.8, with liming advised for pH levels below 5.5. Avoid waterlogged or poorly drained soils, as these conditions can lead to root disease problems.
Climatic Requirements
Temperature Preferences
This cool-season crop thrives in moderate temperatures, with an optimal growing range between 60°F and 75°F (15°C to 24°C). It exhibits good tolerance to light frosts, which can actually improve the flavor of the crop. With adequate protection, it can even survive temperatures as low as 20°F (-6°C). However, sustained heat is detrimental; consistent temperatures above 85°F (29°C) often lead to problems like bitterness in the leaves, significantly slowed growth, and premature bolting (flowering).
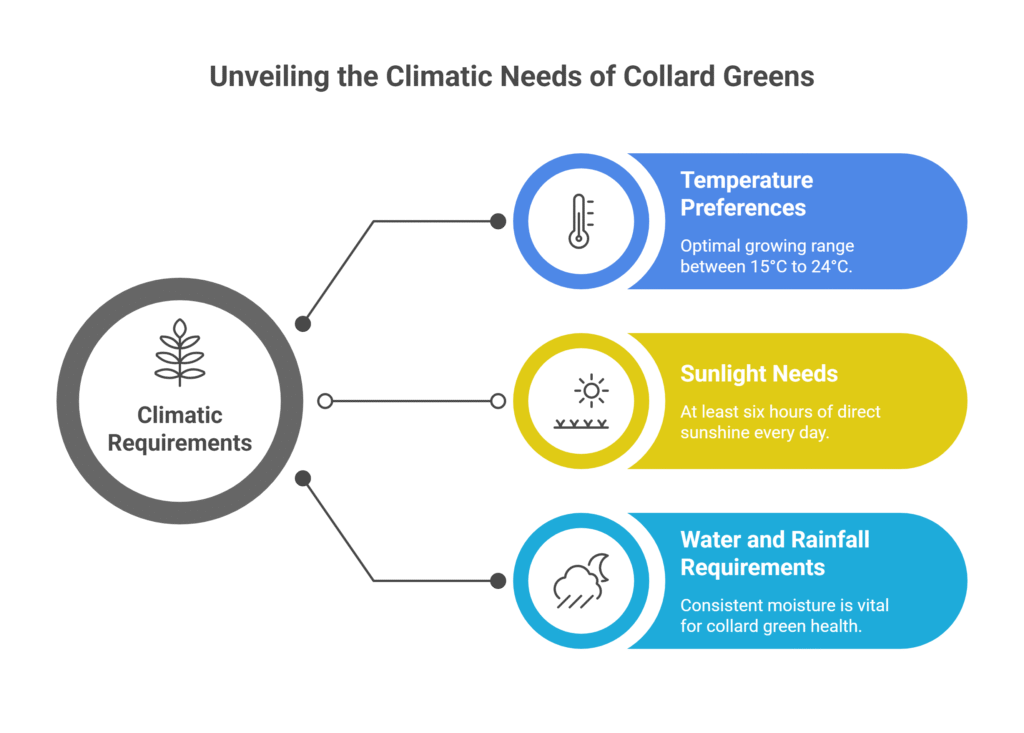
Sunlight Needs
This crop needs a spot that receives full sun, which is defined as at least six hours of direct sunshine every day, for robust growth and maximum leaf production. Although it thrives in these bright environments, it is rather adaptable and may survive in partially shaded locations, though growth may be less vigorous.
Water and Rainfall Requirements
Consistent soil moisture is crucial for this plant. It grows best in regions that experience moderate, well-distributed rainfall throughout its growing season. Reliance solely on natural rainfall is often insufficient; supplemental irrigation is essential during periods of dry weather to maintain the necessary moisture levels and prevent stress.
Major Cultivars
Selection of collard green varieties depends on factors such as the local climate, the desired harvest time, the preferred leaf type, and the plant’s resistance to diseases.
| Variety | Also Known As | Type | Growth Habit/Form | Leaf Characteristics | Key Attributes |
| Georgia Southern | Creole, Georgia | Heirloom | Standard | Large, blue-green, wavy | Excellent flavor, cold-hardy, slow to bolt |
| Vates | Vates Blue Curled | – | Dwarf, compact | Dark blue-green, finely curled | Very cold-hardy, space-efficient, wind-resistant |
| Champion | – | – | Vigorous | Large, smooth, dark blue-green | Bolt-resistant, high yield |
| Flash | – | Hybrid | Uniform | Smooth, dark green | Fast-maturing, heat/bolt-tolerant |
| Top Bunch | – | Hybrid | Upright (easy harvest) | Smooth, dark green | Uniform growth |
| Morris Heading | – | – | Loose head (cabbage-like) | Tender | Cold-tolerant |
Propagation
Almost exclusively propagated by seed.
Direct Seeding
In the direct seeding method, seeds are sown straight into the prepared field where the crop will mature. This approach is simple, cost-effective, and reduces the need for handling seedlings. It is best suited for crops that germinate and establish quickly. Direct seeding often results in a natural stand, although it may require thinning to achieve proper plant spacing.
Transplanting
In the transplanting method, seeds are first sown in a nursery bed or seed trays. Seedlings are raised for about 4–6 weeks until they develop a strong root system and several true leaves. These young plants are then carefully transplanted into the main field. Transplanting offers several benefits, including a more uniform crop stand, earlier harvests, and improved weed management, as the stronger seedlings can outcompete weeds more effectively. It also allows better control over plant population and spacing.
Seed Rate per Acre
For direct seeding, the recommended seed rate is 225–450 grams per acre, while for transplanting, a lower rate of 110–225 grams per acre is sufficient due to controlled nursery conditions and subsequent thinning of seedlings.
Nursery Management
Nursery Location
For transplanting, select a sunny, sheltered area with well-drained soil or prepare raised seedbeds to ensure proper drainage and healthy seedling growth.
Bed Preparation
prepare raised beds 0.8–1.0 meter wide, 1.0–1.5 meters long, and 15–20 cm high to ensure good drainage, with 30–40 cm pathways between beds for easy access. Loosen the soil to a fine tilth, remove stones and debris, and mix in compost or well-rotted manure at 2–3 kg per square meter to improve fertility.
Sowing Seeds
Sow seeds thinly about 0.5 inch (1.25 cm) deep in rows spaced 2–3 inches apart or lightly broadcast them and cover with a thin layer of soil. This ensures even germination and reduces overcrowding.
Watering and Moisture Management
Keep the soil consistently moist using fine misting or light watering. Avoid waterlogging, as soggy conditions can damage young seedlings.
Thinning Seedlings
When seedlings develop 1–2 true leaves, thin them to 1–2 inches apart. This prevents legginess and allows each plant sufficient space to grow strong roots and stems.
Fertilization
If the soil fertility is low, apply a light, balanced starter fertilizer (e.g., 10-10-10 at half strength) after thinning to promote healthy seedling development.
Hardening Off
Around 7–10 days prior to transplanting, seedlings should be gradually acclimated to outdoor conditions, including sunlight, wind, and lower temperatures. This process strengthens the plants, minimizes transplant shock, and helps them adjust to the field environment.
Planting
a). Planting Season
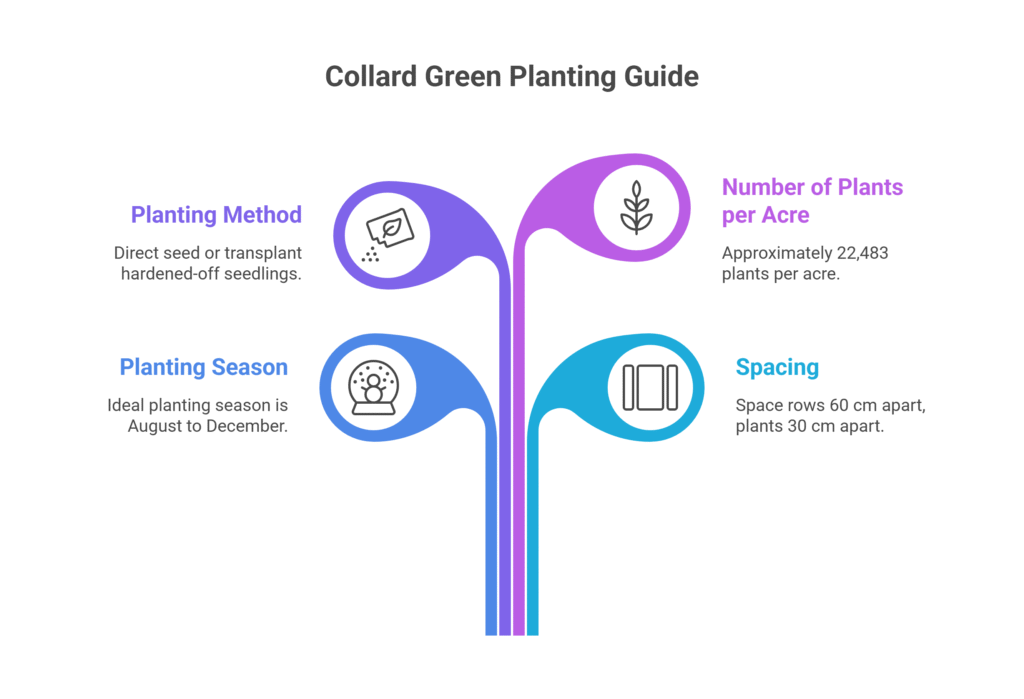
For collard greens, the ideal planting period is from August to December, taking advantage of the cooler months for optimal growth and leaf quality.
b). Spacing
For optimal growth, collard greens should be spaced with rows set 60 cm apart and plants positioned 30 cm apart within each row, ensuring adequate air circulation, efficient nutrient uptake, and ease of field operations such as weeding and harvesting.
c). Planting Method
For planting, either direct seed by sowing 2–3 seeds per hole at 0.5 inch depth and thinning to the strongest seedling after emergence, or transplant hardened-off seedlings at their nursery depth, gently firming soil around the roots and watering thoroughly afterward.
d). Number of Plants per Acre:
At a spacing of 60 cm between rows and 30 cm between plants, an acre generally holds approximately 22,483 plants.
Intercropping
Collard greens can be intercropped with fast-maturing crops like radishes, lettuce, spinach, or green onions early in the season before the canopy closes, but should not be grown alongside other Brassicas such as cabbage, kale, broccoli, or cauliflower due to shared pests and diseases; intercropping helps maximize land use, suppress weeds, and may confuse pests.
Irrigation
Maintaining consistent soil moisture is crucial for producing tender collard greens and avoiding bitterness or premature bolting. Water deeply once or twice a week, supplying roughly 1–1.5 inches of water, with adjustments based on weather, rainfall, and soil conditions. Drip irrigation is the most efficient method, minimizing water waste and reducing disease risk, though soaker hoses or early-morning overhead watering are also effective. Mulching with organic materials like straw or shredded leaves helps conserve moisture, control weeds, and keep soil temperatures stable.
Fertilizer and Manure
A soil test is essential for precise fertilizer recommendations. Before planting, incorporate 10–15 tons (10,000–15,000 kg) of well-rotted farmyard manure or compost per acre along with a balanced fertilizer—such as 27–36 kg nitrogen (N), 18–27 kg phosphorus (P₂O₅), and 27–36 kg potassium (K₂O) per acre—based on soil test results.
Since collards are heavy nitrogen feeders, apply 14–23 kg nitrogen per acre as a side dressing 3–4 weeks after transplanting or when plants are 15–20 cm tall, and consider a second application 4–6 weeks later for long-season crops. Suitable nitrogen sources include ammonium sulfate, calcium nitrate, or urea, applied alongside rows and watered in. Organic alternatives such as blood meal, fish emulsion, or compost tea can also be used.
Weed Control
Controlling weeds is crucial because they compete with young collard plants for water and nutrients. Shallow cultivation, including hoeing or mechanical weeding, should be performed when weeds are small and before collards become too large, taking care around the roots.
Mulching with organic materials or plastic is highly effective, and hand weeding between rows is often necessary. Pre-emergent herbicides like Trifluralin or DCPA can be applied carefully following label instructions, while post-emergent herbicides such as Sethoxydim or Clethodim may be used selectively for grass control in accordance with local regulations and crop guidelines.
Interculture Operation
Regularly prune collard greens by removing old, yellowing, or damaged lower leaves that touch the ground to improve air circulation, reduce disease risk, and promote new growth, and promptly cut any flower stalks (bolts) to redirect energy back into leaf production, although bolting typically indicates the end of the prime harvest period.
Flowering and Fruit Management
Flowering or bolting in collard greens is primarily triggered by prolonged cold followed by warm weather, high temperatures during the growing season, or long daylight hours. To manage bolting, select bolt-resistant cultivars, plant at the appropriate time to avoid stress from heat or cold, maintain consistent soil moisture, and prevent nutrient deficiencies. Collards are cultivated for their leaves rather than fruit, so flowers and seed pods are not harvested commercially.
Pest and Disease Management
Common Pests
Aphids
Aphids can spread viruses and feed on plant sap, which can cause growth retardation and leaf curling. For control, apply a solution of insecticidal soap at a rate of 2–3%, neem oil at a rate of 2 ml per liter of water, or use a powerful water jet to push plants away. Promote ladybugs and other natural predators, or if infestations are severe, use systemic pesticides such imidacloprid at a rate of 0.5–1 ml per liter.
Cabbage Loopers/Imported Cabbageworms
These caterpillars chew irregular holes in leaves, reducing yield and quality. Control measures include applying Bt (Bacillus thuringiensis) at 1–2 g per liter of water or Spinosad at 0.5–1 ml per liter. Hand-picking larvae and using floating row covers can also be effective preventive strategies.
Diamondback Moth Larvae
Similar to loopers, these larvae feed on leaves, often causing skeletonized foliage. Use Bt at 1–2 g per liter or Spinosad at 0.5–1 ml per liter. Chemical rotation is important to prevent resistance, so alternate with suitable insecticides such as Indoxacarb at 0.5 ml per liter following label instructions.
Flea Beetles
These tiny beetles create small “shot holes” in seedlings, which can weaken young plants. Control options include row covers to protect seedlings, dusting with diatomaceous earth, or applying insecticides such as pyrethrins at 1–2 ml per liter or carbaryl at 2–3 g per liter of water.
Cabbage Root Maggots
Larvae feed on roots, stunting or killing plants. Prevention includes using row covers with sealed edges, applying beneficial nematodes (Steinernema spp.) to soil, or drenching soil with Spinosad at 1–2 ml per liter around the base of plants.
Cutworms
These larvae sever stems at soil level, often killing young plants. Management involves placing collars around transplants, tilling the soil before planting to expose larvae, and using baits containing Bacillus thuringiensis or insecticidal granules at recommended label rates.
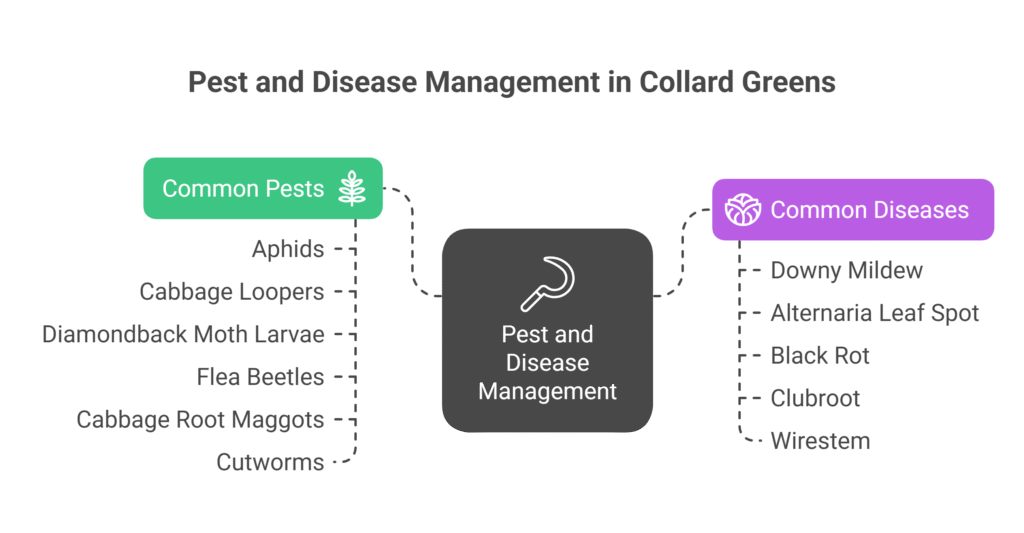
Common Diseases
Downy Mildew
Downy mildew is characterized by fuzzy gray or purple growth underneath yellow areas on the upper leaf surface. It does best in damp, cool weather. Planting resistant types, maintaining adequate air circulation, avoiding overhead irrigation, and thoroughly spraying both leaf surfaces every seven to ten days as needed with fungicides like copper oxychloride (2–3 g per liter of water) or mancozeb (2–3 g per liter) are all part of management.
Alternaria Leaf Spot
This disease causes dark brown to black circular spots with concentric rings. Management involves crop rotation, removing and destroying infected debris, and applying fungicides like mancozeb at 2–3 g per liter or chlorothalonil at 2 g per liter of water, following label instructions for repeated sprays at 7–10 day intervals.
Black Rot
Black rot, a bacterial disease, produces V-shaped yellow lesions along leaf margins and blackened veins. Preventive measures include using resistant varieties, disease-free seeds, and crop rotation for at least three years. While bacterial, copper-based fungicides such as copper oxychloride at 2–3 g per liter can reduce spread during favorable conditions; avoid working in wet fields to minimize infection.
Clubroot
Clubroot causes swollen, distorted roots and stunted growth in acidic, poorly drained soils. Management includes long crop rotations of seven or more years, liming soil to pH 7.0–7.2, planting resistant varieties, improving soil drainage, and sanitizing tools. Fungicides are generally ineffective once infection occurs, so prevention is key.
Wirestem (Damping-off)
This affects seedlings, causing them to collapse at the soil line. Preventive measures include using sterile seed-starting mix, ensuring good drainage, and avoiding overwatering. Fungicidal seed treatments such as captan at 2–3 g per liter of water can help protect seedlings from damping-off.
Harvesting
Collard greens should be harvested when leaves reach a usable size of 8–10 inches, typically 55–85 days after planting depending on variety and season. The most common method is leaf-by-leaf “cut-and-come-again,” where older, larger lower leaves are snapped or cut close to the main stalk while leaving the central growing bud intact, allowing the plant to continue producing new leaves for weeks or months.
Alternatively, the whole plant can be cut at the base when fully mature, which yields more at once but ends production. Leaves should be harvested every 1–2 weeks during peak season, selecting dark green, crisp, and tender leaves while avoiding yellowed, damaged, or diseased ones. For best quality, harvest in the cool morning hours and immediately cool the leaves using hydro-cooling or an ice water bath if possible, then store at high humidity near 32°F (0°C), as collard leaves are highly perishable.
Yield
The average yield of collard greens typically ranges from 4 to 6 tons per acre.
Cost of Investment Per Acre for Collard Green Farming
| S.N. | Categories | Cost (NRs.) | ||
| 1 | Land Preparation (plowing) | 15,000 | ||
| 2 | Seed | 2,500 | ||
| 3 | Nursery Management | 5,000 | ||
| 4 | Transplanting | 3,000 | ||
| 5 | Fertilizers and Manure | 7,000 | ||
| 6 | Irrigation | 5,000 | ||
| 7 | Weed Control (pre & post-emergence) | 2,000 | ||
| 8 | Pest & Disease Control | 3,000 | ||
| 9 | Harvesting | 4,500 | ||
| 10 | Miscellaneous Costs | 5,000 | ||
| Total Cost of Investment | 52,000 | |||
Income Per Acre from Collard Green Farming
| Particulars | Quantity (per Acre) | Unit Price (NRs.) | Total (NRs.) |
| Yield | 5,000 kg | 45 / kg | 225,000 |
| Total Income | 225,000 |
Analysis of Collard Green Farming
| Particulars | Amount (NRs.) |
| Total Income | 225,000 |
| Total Cost | 52,000 |
| Net Profit | 173,000 |
The profit analysis of collard green farming per acre shows that the total income is NRs. 225,000 against a total cost of NRs. 52,000, resulting in a net profit of NRs. 173,000. The financial indicators highlight strong profitability, with a Benefit-Cost Ratio of 4.33, meaning every rupee invested returns about 4.3 rupees. The net profit margin stands at approximately 76.9%, while the Return on Investment (ROI) is exceptionally high at around 332%, indicating that collard green farming is a highly lucrative enterprise under the given assumptions.
Crop Calendar of Collard Green
| Month | Key Activities | Technical Specifications |
| July | Land Preparation | · Clear debris, plow to 8–12″ depth. · Incorporate 10–15 tons/acre of compost/FYM during harrowing. · Form raised beds (4–6″ high, 3–4 ft wide) if drainage is poor. |
| Nursery Start (Transplant Method) | · Prepare nursery beds (0.8–1m wide, 15–20cm high). · Sow seeds @ 0.5″ depth, rows 2–3″ apart. · Maintain moist soil; avoid waterlogging. | |
| August | Transplanting | · Transplant 4–6-week-old seedlings (hardened off). · Spacing: 60 cm × 30 cm (22,483 plants/acre). · Water immediately after transplanting. |
| Direct Seeding | · Sow 2–3 seeds/hole @ 0.5″ depth. Thin to 1 plant/hole after germination. · Seed rate: 225–450 g/acre. | |
| September | Crop Establishment | · Apply 1st side-dressing (14–23 kg N/acre) at 3–4 weeks. · Install drip irrigation; supply 1–1.5″ water/week. · Mulch with straw for moisture/weed control. |
| Weed & Pest Control | · Apply pre-emergent herbicides (e.g., Trifluralin). · Scout for flea beetles/aphids; use neem oil (2ml/L) if detected. | |
| October | Active Growth Management | · 2nd side-dressing (N) if needed. · Monitor for pests (loopers, diamondback moths); spray Bt (1–2g/L) if infestations occur. · Remove yellowing/damaged leaves. |
| November | Disease Prevention | · Ensure airflow to prevent downy mildew/black rot. · Apply copper fungicide (2–3g/L) if wet conditions persist. · Continue irrigation as needed. |
| December | Harvest Begins | · Start “cut-and-come-again” harvesting at 55–85 days. · Pick lower leaves (8–10″ long) every 1–2 weeks. · Harvest in cool mornings; hydro-cool leaves. |
| January | Peak Harvest & Post-Harvest | · Continue selective leaf harvesting. · Store at 0°C with high humidity. · Remove bolted plants promptly. · Prepare for next cycle. |
Sources
Food and Agriculture Organization (FAO)
University of California Agriculture & Natural Resources (UC ANR)
European Plant Protection Organization (EPPO)
Punjab Agricultural University (PAU)
Tamil Nadu Agriculture University (TNAU) – Agritech portal
Indian Council of Agricultural Research (ICAR)
Nepal Agricultural Research Council (NARC)
U.S. Department of Agriculture (USDA).
Disclaimer: This crop farming profits assume optimal conditions. Actual results may vary depending on climate, market prices, and farm management practices.