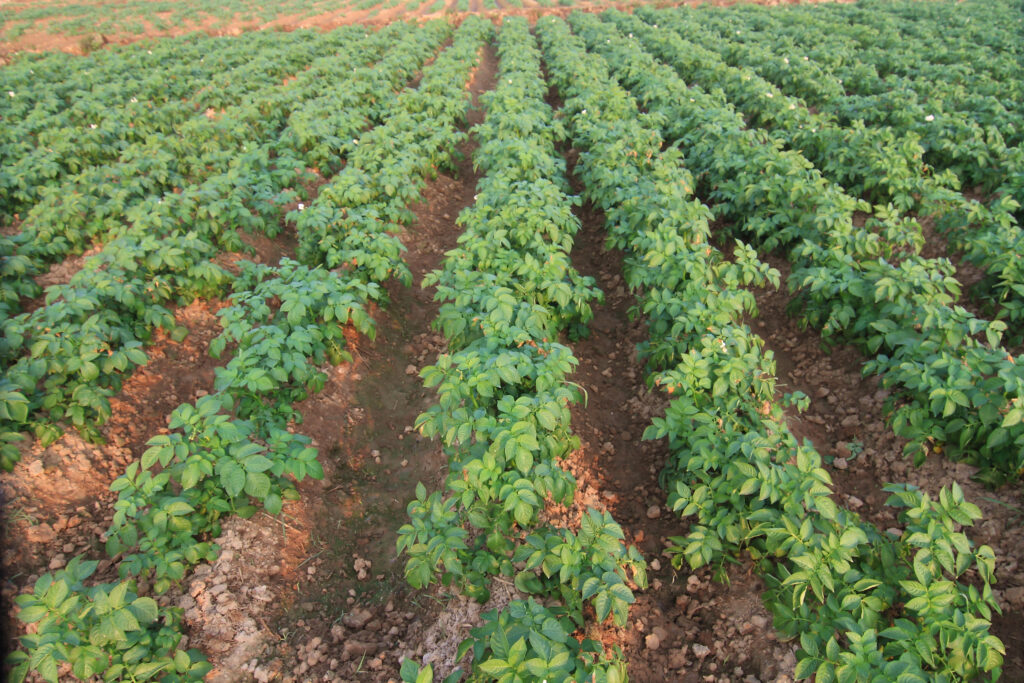
Potato Farming
Potato farming profit per acre is shaped by a combination of biological factors and economic inputs. Potatoes develop shallow, fibrous roots (≤60cm), limiting access to deeper nutrients and moisture compared to deeper-rooted crops like cereals (≥120cm). Optimal root growth occurs at 15–20°C (59–68°F), while leaf and stolon growth peaks at 20–25°C (68–77°F).
Tuber formation, triggered by short daylight and hormonal shifts, thrives in cooler soils (15–20°C / 59–68°F), with low nitrogen and high sucrose levels enhancing yield. Rapid tuber growth (up to 1,400 kg/ha/day in temperate zones) and sensitivity of late varieties to prolonged daylight or heat underscore the need for precise climate management. Financially, with a total investment of NRs. 134,000 per acre and income of NRs. 300,000 (20,000 kg yield × NRs. 15/kg), potato farming generates a net profit of NRs. 166,000/acre and a 55.33% profit margin, reflecting robust profitability under ideal agronomic and market conditions.
Land Preparation
Land preparation for potato farming involves a systematic process starting with deep plowing (15-20 cm) to loosen compacted soil, followed by harrowing to break soil clods and level the field, ensuring uniform seedbed conditions. Subsequently, ridges, raised beds, or furrows (15-30 cm in height) are formed to improve drainage, prevent waterlogging, and create optimal spacing for tuber expansion.
Critical to this stage is soil aeration, which enhances oxygen availability to roots and promotes healthy tuber development by enabling proper root respiration and nutrient uptake. Together, these steps—plowing, bed formation, and aeration—establish a well-structured, aerated soil environment essential for maximizing potato yield and quality.
Soil Type
Sandy loam and medium loam soils that are high in organic matter provide the best yields for potatoes, which do best in well-drained soils to avoid tuber rot. Although a variety of soil types, such as clay, silt loam, sandy loam, and loam, can support them, heavy clay, wet, saline, or alkaline soils are not ideal. While potatoes can grow in soil with a pH of 4.5 to 8.5, 5.5 to 7.0 is the optimal range.
Low pH (<5.5) decreases the availability of phosphorus and molybdenum and raises the risk of aluminum toxicity, whereas high pH (>7.5) limits the intake of micronutrients and phosphorus and makes people more vulnerable to common scab. By balancing pH and promoting healthy tuber growth and optimum nutrient access, liming acidic soils at least six months prior to planting reduces the risk of disease.
Climatic Requirements
Potato cultivation thrives in cool climates with daytime temperatures of 15–20°C (65–80°F) and nighttime temperatures of 10–15°C (55–65°F), though frost-sensitive crops must be planted after the last frost. While potatoes require at least six hours of daily sunlight for optimal growth, they tolerate dappled shade, albeit with reduced yields and smaller tubers.
Annual rainfall of 500–700 mm supports growth, but supplemental irrigation is essential in dry regions to maintain soil moisture and prevent stress. Balancing temperature, sunlight, and water ensures healthy tuber development and maximizes productivity in diverse growing conditions.
Major Cultivars
| Variety Name | Key Characteristics | Maturity Period | Tuber Description | Yield | Disease Resistance/Tolerance | Special Notes |
| Russet Burbank | Long tubers, netted russet skin, high starch content | – | Ideal for french fries and baked potatoes | – | Susceptible to late blight | Processing cultivar; consistent quality, long storage |
| Yukon Gold | Smooth yellow skin, golden flesh, buttery flavor | Mid-season | Versatile for mashing, roasting, boiling | – | Good disease resistance | Popular table variety; adaptable to growing conditions |
| Kennebec | Smooth light skin, white flesh, high-yielding | – | Suitable for frying, baking, boiling, chipping | – | Resistant to blight, scab | Reliable, adaptable to diverse conditions |
| Kufri Jyoti | Large, oval, white-skinned tubers; waxy texture, mild flavor | 110–120 days | Shallow eyes, white flesh | 20–25 tonnes/ha | Moderately resistant to early/late blight | Adaptable to Indian agro-climatic regions |
| Kufri Ashoka | Medium height, medium-thick stem | 70–80 days | Large, oval, white, smooth skin | – | Susceptible to late blight | – |
| Kufri Badshah | Tall plants, 4–5 stems/plant | 90–100 days | Large-medium, oval, dull white flesh; tasty, flavorful | 130 qtl/acre | Resistant to late/early blight; frost-tolerant | – |
| Kufri Bahar | Tall plants, thick stems (4–5/plant) | 90–100 days | Large, white, round to oval; white flesh | 100–120 qtl/acre | Resistant to late blight, early blight, leaf roll | Average keeping quality |
| Kufri Chamatkar | Medium, spreading plants; dark green foliage, multiple stems | 110–120 days (plains), 150 days (hills) | Round, yellow flesh | 100 qtl/acre (plains), 30 qtl/acre (hills) | Resistant to late blight, brown rot, charcoal rot, wilt | – |
| Kufri Chipsona 2 | Medium-tall plants, few stems; dark green foliage, white flowers | – | White, medium-sized, round-oval, smooth skin | 140 qtl/acre | Resistant to late blight | Ideal for chips and french fries |
| Kufri Chandramukhi | Medium-tall plants | 80–90 days (plains), 120 days (hills) | Oval, white tubers; dull white flesh | 100 qtl/acre (plains), 30 qtl/acre (hills) | Susceptible to late blight, brown rot, charcoal rot, wilt | Good keeping quality |
| Kufri Pukhraj | Early-maturing, high-yielding | – | Golden-yellow skin, excellent cooking quality | 160 qtl /acre | Resistant to major pests/diseases | It is resistant to early blight and not suitable for processing. |
Planting
a). Season
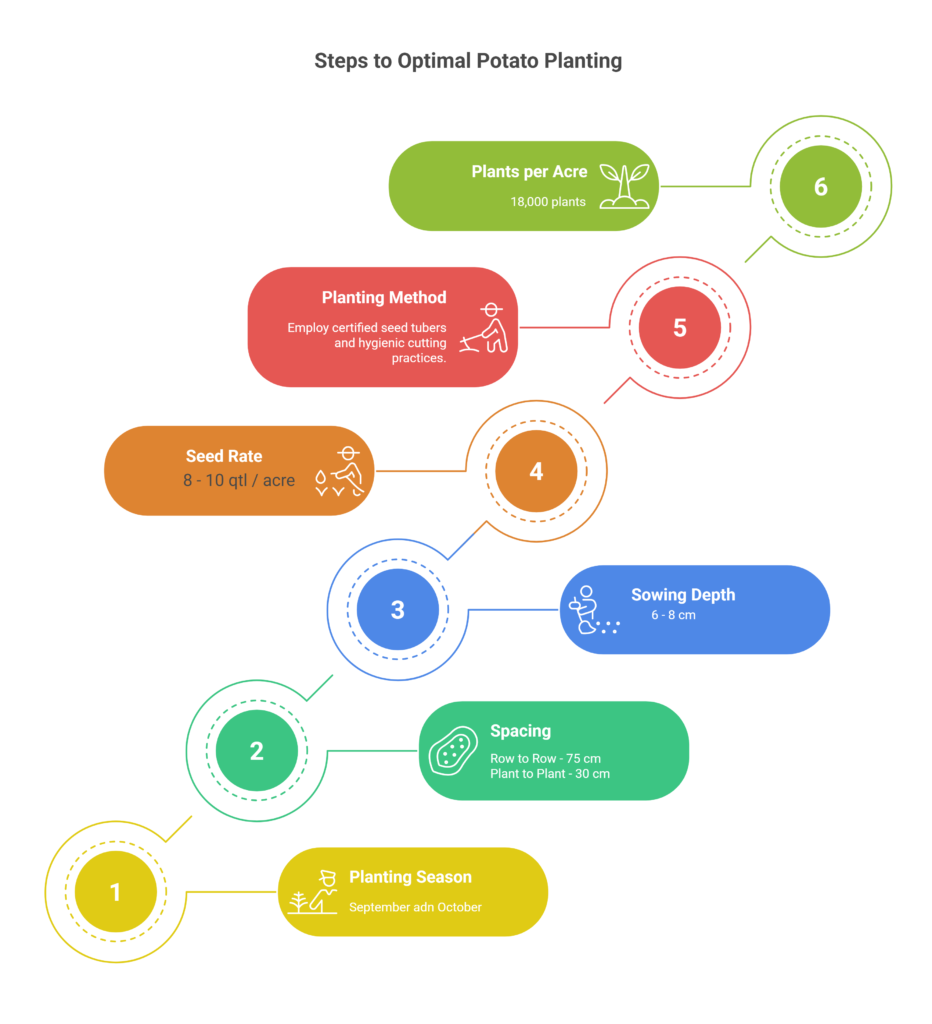
Timely planting is crucial for achieving optimal yields. The ideal planting period is when the maximum and minimum temperatures range between 30-32°C and 18-20°C, respectively. For early-season crops, planting should be completed between September 25 and October 10. Medium-duration crops are best sown from the first to the third week of October, while late-duration crops should be planted between the third week of October and the first week of November. For spring crops, the second half of January is the most suitable planting time.
b). Spacing
Optimal spacing is critical for maximizing potato yield and plant health. The recommended configuration—75 cm between rows and 30 cm between plants within rows—ensures adequate room for root expansion, sunlight penetration, and airflow. Wider row spacing (75 cm) facilitates mechanized farming practices, reduces competition for nutrients and water, and minimizes disease risks by improving ventilation.
Narrower plant-to-plant spacing (30 cm) balances population density, allowing each tuber sufficient space to develop without overcrowding. This structured arrangement promotes uniform tuber size, enhances photosynthesis efficiency, and supports effective weed and pest management. Proper spacing also optimizes resource utilization, ensuring healthy canopy growth and robust tuber formation, ultimately contributing to higher-quality harvests and improved farm productivity.
c). Sowing Depth
Dig a trench 6–8 inches (15–20 cm) deep. Plant seed potato pieces (cut tubers with at least 1–2 “eyes”) with the eyes/sprouts facing upward to encourage healthy growth. Ensure proper spacing between pieces for optimal tuber development.
c). Seed rate and seed treatment
For planting, use a seed rate of 8–10 quintals per acre for small tubers, 10–12 qtl/acre for medium-sized tubers, and 12–18 qtl/acre for large tubers, prioritizing whole seeds to ensure disease-free quality. Select medium-sized tubers (25–125 gm) from reliable sources; after cold storage, store them in a cool, shaded area for 1–2 weeks to promote sprouting.
To achieve uniform sprouting, treat tubers with Gibberellic acid (1 gm/10 liters of water) for 1 hour, dry in shade, and store in a dim, aerated room for 10 days. Before planting, dip cut tubers in a 0.5% Mancozeb solution (5 gm/liter of water) for 10 minutes to prevent early-stage rotting. For additional protection against rotting and black scurf, treat both whole and cut tubers with a 6% Mercury solution (Tafasan) at 0.25% concentration (2.5 gm/liter of water).
c). Method
Use certified disease-free seed tubers cut into 35–50g pieces, each containing 2–3 viable eyes, to ensure vigorous sprouting and minimize disease transmission. Properly sized seed pieces promote uniform plant establishment, while adhering to hygienic cutting practices reduces the risk of contamination and enhances crop productivity.
d). Plants per Acre
To achieve optimal growth and yield, maintain a planting density of 18,000 plants per acre by spacing seed tubers 30 cm (12 inches) apart within rows and 75 cm (30 inches) between rows. This configuration ensures efficient space utilization, proper airflow, and adequate access to sunlight and nutrients, supporting healthy plant development and maximizing productivity.
Irrigation
| Growth Stage | Key Requirements | Irrigation Methods | Frequency/Duration | Notes & Considerations |
| Tuber Initiation | Consistent moisture (avoid dry ridges) | Drip (preferred) or furrow | Maintain moist soil | Prevents common scab; avoid moisture fluctuations (>10% variation causes malformation). |
| Tuber Bulking | ~1 inch/week water supply | Drip (tapes atop ridges) | Every 5–7 days in dry spells | Avoid waterlogging to reduce powdery scab/lenticel growth; ensure uniform soil moisture. |
| Pre-Harvest | Dry conditions | Stop irrigation | 10–12 days before harvest | Prevents tuber rot and eases harvesting. |
Fertilizer and Manure
Here are the various growth stages of potatoes when fertilizer should be applied.
a). Pre-Planting Soil Preparation
Apply 15–20 tons of compost/ha two months before planting to enhance soil structure and nutrient integration. Conduct soil tests to maintain a pH of 5.0–6.0, avoiding fresh manure near planting time.
b). At Planting
Apply 150 kg DAP, 50 kg MOP, 15 kg magnesium sulfate, 1 kg Azotobacter with 15 kg compost, and 1 kg PSB with 15 kg compost per acre. Provide 50–80 kg/ha nitrogen for early growth, ensuring phosphorus availability for tuber development.
c). Vegetative Growth (2–4 Weeks)
Side-dress with nitrogen to support foliage and stem development. Balance ammonium and nitrate forms to avoid diseases and ensure sustained nutrient availability.
d). Tuber Initiation (5–7 Weeks)
Apply foliar phosphorus (NPK 0:52:34) at 3–5 g/L to increase tuber set and size. Maintain high phosphorus levels to support root and shoot development.
e). Tuber Bulking (8–10 Weeks)
Shift focus to phosphorus and potassium for tuber quality and disease resistance. Use NPK 0:0:50 sprays (3–5 g/L) and potassium-rich fertilizers to enhance starch formation and tuber growth.
f). Tuber Maturation (10–12 Weeks)
Stop nitrogen applications to prevent vine growth. Maintain potassium and phosphorus levels, apply micronutrients, and manage irrigation to ensure optimal tuber size and quality.
Weed Control
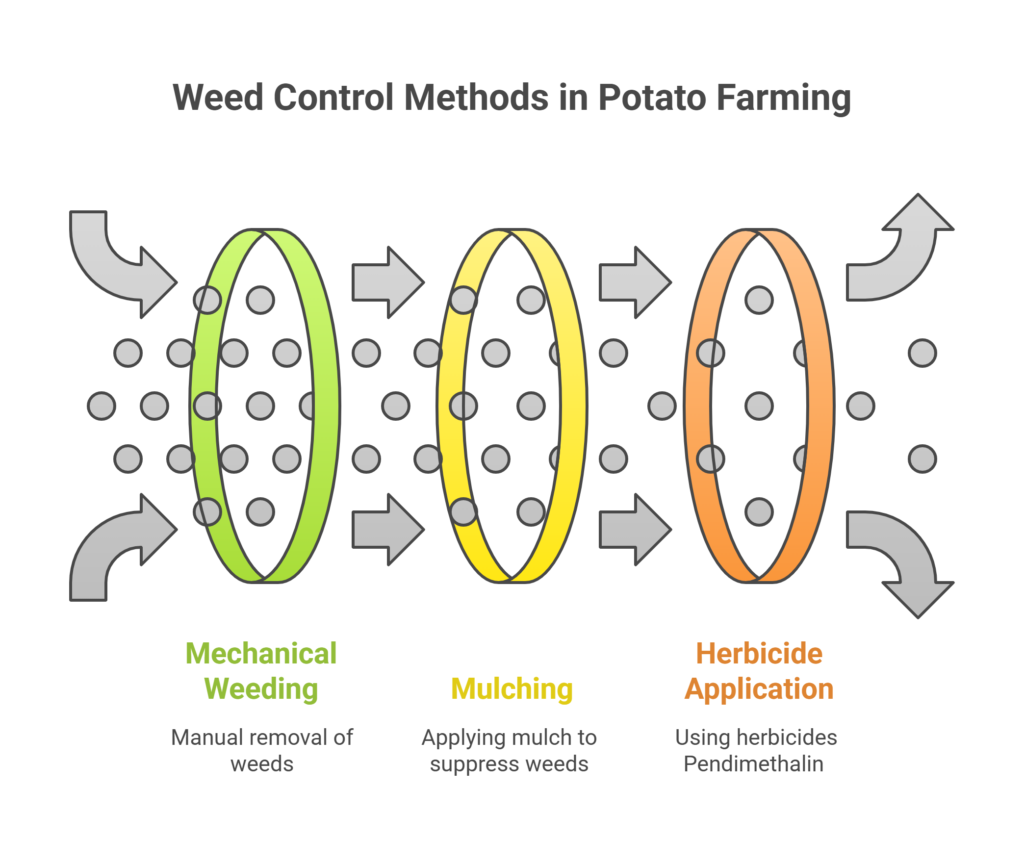
Weed control is critical in potato farming, as weeds compete for nutrients, water, and sunlight, reducing yields and increasing disease risks. Below is an elaboration of the three primary methods:
a). Mechanical
Manual weeding or hoeing is essential during the first 4–6 weeks after planting, as potato plants are highly susceptible to weed competition during their early growth stages. Uncontrolled weeds can overshadow young plants, stunting tuber development. Using hoes or hand tools to carefully remove weeds near the plant base, while avoiding damage to shallow roots, ensures healthy growth. Weeding should be repeated every 10–14 days until the canopy closes to block sunlight to weeds. This practice not only promotes soil aeration but also minimizes pest and disease habitats, supporting robust tuber development.
b). Mulching
Straw or plastic can be used for mulching in potato farming. While plastic mulch, usually colored or black, stops weeds from growing and heats the soil, making it perfect for colder areas, straw mulch, which is 3–4 inches thick, filters sunlight, suppresses weeds, retains moisture, and controls soil temperature. Apply mulch as soon as possible after planting or in the early phases of growth, and make sure it is securely fastened to avoid displacement. Because straw breaks down into organic matter, it improves soil health and lessens the need for pesticides. However, straw may contain bugs if it is not carefully sourced, and plastic mulch needs to be properly disposed of after harvest.
c). Herbicides
Pre-emergence herbicides like Metribuzin (e.g., Sencor) and Pendimethalin (e.g., Stomp) are applied immediately after planting, before weed germination, to suppress early weed growth, but require careful dose calibration to avoid crop damage and should be avoided in sandy or leaching-prone soils. Post-emergence herbicides such as Rimsulfuron target broadleaf weeds after potato plants emerge but must be applied selectively to avoid foliage contact, which can cause phytotoxicity. Always adhere to label instructions for mixing, timing, and protective gear, and rotate herbicide groups to mitigate weed resistance risks.
Pest and Disease Management
Common Pests
a). Potato Tuber Moth
The potato tuber moth, a major pest in fields and storage, damages tubers by tunneling and feeding on flesh. To prevent infestation, use disease-free seeds and well-decomposed cow dung. If detected, spray Carbaryl@1gm per liter of water to mitigate damage and protect crops.
b). White grub
White grubs damage potato crops by feeding on roots, stems, and tubers, causing plants to dry up and leaving holes in tubers. To prevent infestations, broadcast Carbofuran 3G at 12 kg/acre or Thimet 10G at 7 kg/acre during sowing.
c). Leaf eating Caterpillar
Leaf-eating caterpillars damage potato crops by feeding on foliage, reducing photosynthetic capacity; if infestations occur, spray Chlorpyrifos or Profenofos at 2ml per liter of water, or Lambda Cyhalothrin at 1ml per liter, to control larvae and protect yield.
d). Aphid
Aphids, including adults and nymphs, weaken potato plants by sucking sap, leading to curling and deformation of young leaves; their honeydew secretion promotes sooty mold growth. To control infestations, cut foliage as per regional timing guidelines and, if aphids or jassids are detected, spray Imidacloprid@50ml or Thiamethoxam@40gm per acre mixed in 150 liters of water to suppress populations and mitigate damage.
e). Epilanchna Beetle
Both larvae and adults damage potato crops by feeding on leaves, reducing photosynthetic efficiency. To control early infestations, manually collect and destroy beetle eggs away from the field. If damage persists, apply a targeted spray of Carbaryl@1gm per liter of water to suppress beetle populations and protect foliage health.
Insecticidal soap or pyrethroids.
Common Diseases
a). Early blight
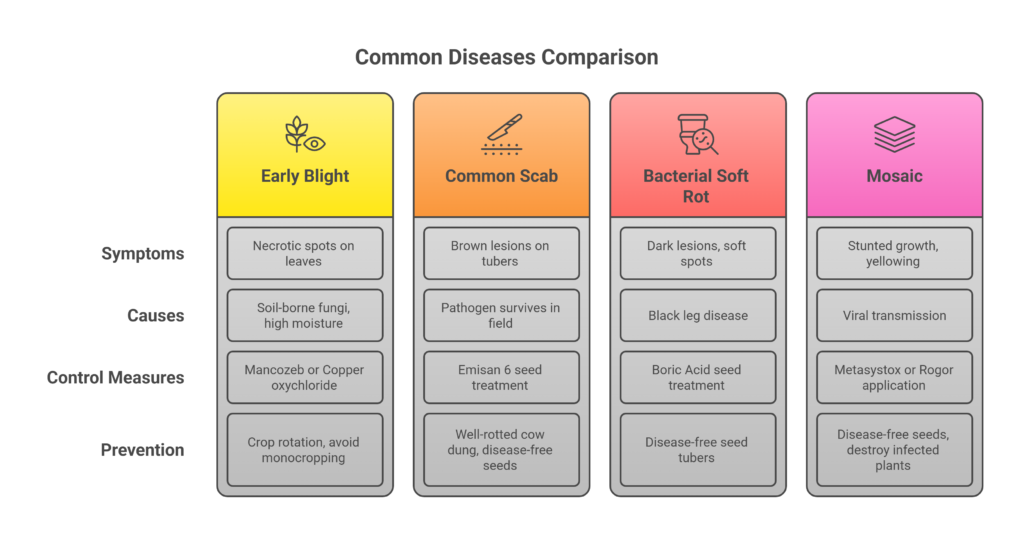
Necrotic spots on lower leaves, caused by soil-borne fungi thriving in high-moisture, low-temperature conditions, can be mitigated by avoiding monocropping and adopting crop rotation. If symptoms appear, apply Mancozeb@30gm or Copper oxychloride@30gm/10L water at 45 days after planting, repeating 2–3 times at 10-day intervals to suppress fungal spread and protect crop health.
b). Common scab
The pathogen, which survives in both field and storage, spreads rapidly under low-moisture conditions, causing light to dark brown lesions on tubers. To mitigate infection, use well-rotted cow dung, disease-free seeds, and avoid deep planting. Practice crop rotation and avoid monocropping. Pre-sowing, treat seeds with Emisan 6@0.25% (2.5gm/liter of water) for 5 minutes to reduce fungal carryover and protect tuber quality.
c). Bacterial soft rot
Black leg disease manifests as dark lesions at the plant base, yellowing foliage, wilting, and reddish-brown soft spots on tubers. To control, use disease-free seed tubers and treat them with 3% Boric Acid solution (300gm/10Ltr water) for 30 minutes before shade-drying; repeat treatment pre-storage. In plains, additionally treat seeds with 1% Carbendazim (100gm/10Ltr water) for 15 minutes to suppress fungal infection. Avoid infected fields for planting and ensure proper tuber storage hygiene to minimize disease spread.
d). Mosaic
Mosaic-affected plants exhibit stunted growth, faint yellowing, and reduced tuber size/number. To control spread, use disease-free seeds, regularly inspect fields, and immediately destroy infected plants. Apply Metasystox or Rogor@300ml in 200 liters of water per acre to suppress viral transmission and protect crop health.
Harvesting
Potatoes are typically harvested 90–120 days after planting, once foliage yellows and dries, signaling maturity. Harvest manually (using hoes) or mechanically, ensuring gentle handling to prevent tuber bruising. Post-harvest, cure tubers at 10–15°C with 95% humidity for 10–14 days to thicken skins and heal wounds, then store in cool (4–10°C), dark, and ventilated conditions to prolong shelf life. Average yields range from 20–25 tons/acre, varying based on cultivar, irrigation, and pest/disease management practices.
Cost of Investment Per Acre – Potato Farming
| S.N. | Categories | Cost (NRs.) |
| 1 | Land Preparation (ploughing, ridges) | 20,000 |
| 2 | Seed rate per acre | 50,000 |
| 3 | Labor Costs (transplanting) | 7,000 |
| 4 | Fertilizers and Manure | 15,000 |
| 5 | Irrigation | 10,000 |
| 6 | Weed Control | 5,000 |
| 7 | Pest & Disease Control | 10,000 |
| 8 | Harvesting | 9,000 |
| 9 | Miscellaneous Costs | 8,000 |
| Total Cost | 134,000 |
Income from One Acre Potato Farming
| Particulars | Estimated Yield (kg) | Market Price (NRs/kg) | Total Income (NRs.) |
| Potato yield | 20,000 | 15 | 300,000 |
Analysis of Potato Farming Profit Per Acre
The total cost of potato farming per acre is NRs. 134,000, while the total income from selling 20,000 kg of potatoes at NRs. 15/kg amounts to NRs. 300,000, resulting in a net profit of NRs. 166,000 per acre (calculated as NRs. 300,000 − NRs. 134,000). This translates to a profit margin of 55.33%, derived by dividing the net profit (NRs. 166,000) by the total income (NRs. 300,000) and multiplying by 100, demonstrating strong profitability for potato farming under the given cost and yield assumptions.